Patterning the Hip Hinge

If there is a single prerequisite to using kettlebells, it is learning how to hinge. Without a proper hip hinge, you cannot safely or effectively deadlift, swing, clean, snatch, or otherwise properly protect your spine or recruit the posterior chain muscles (back, glutes, hamstrings, even calves).

1. Dowel Hinge

A. Assume your jumping stance. (This is typically the same as hip-width, but you can also jump up and down in place a few times - wherever your feet land is your jumping stance! More often than not, this is the best stance from which to generate and absorb power through the floor, as it vertically stacks the ankles, knees, hips and shoulders.)

B. Reaching one hand over the shoulder and one hand under, secure the dowel in place behind your back, in line with your spine. Establish three points of contact: back of the head, mid-upper back, and tailbone. The goal throughout the dowel hinge is to maintain all three points of contact, which collectively indicate a consistently neutral spine. Often, a first timer will initiate the movement by flexing from the lumbar spine - immediately peeling the dowel or broomstick off of the tailbone and then upper back, leaving only one point of contact as the spine turns into a C-shape. If this happens, don’t panic - stand up, reset, stick out the chest a bit - play around with it until you learn to move from the hips, keeping the back consistent. Think of your hips as a literal hinge - it’s called a Hip Hinge for a very good reason!

2. Wall Hinge

Another equipment-less option is to set up just in front of the wall, facing away, with your hands on your hips to remind you that they are your point of flexion. Stick your rear end straight back, until your tailbone makes contact with the wall. Stand up. Take a small step forward and repeat, feeling a little more stretch in the hamstrings this time. Continue until you have moved far enough away from the wall that your torso is parallel with the floor at the lowest point of your hinge - this as far as you’ll go. Keep that point in mind when you get to your kettlebell swing - the more you sit the hips back and fold the chest to face ground, the greater the potential for power in your swing. Think of it like stretching a rubber band - in this way, you are eccentrically loading the muscles of your posterior chain.

Final point of focus: remember to inhale at the top and exhale to stand - the same way you would exhale upon hip extension with a swing, clean or snatch.

Give these a try and focus on slow, smooth, crisp movement - even if you’re a pro hip hing-er, using either or both of these as a warm up to reinforce solid mechanics pre-lift or swing is never a bad idea. Have fun!

How to Clean a Kettlebell...

… without bruising your wrist.

Yes, it is possible!

If you’ve been incorporating a variety of kettlebell movements into your regular programming for a while now and no longer grapple with this common beginner’s issue, feel free to use the following progression as a warm up for reinforcing and refining your technical skills. While kettlebells have been steadily gaining popularity over the past ten (twenty?) or so years, there is no doubt that the steady growth has turned into much more of a spike in times of COVID-induced gymless-ness. The RKC instructor handbook describes the kettlebell as a full gym incorporated into one piece of equipment. While I’ll always love barbells, dumbbells, sandbags and odd objects, I have to agree that a kettlebell is a saving grace in these times. Since the clean is a staple movement, here is a little review on how exactly to tackle it:

Kettlebell Clean Progression

A. Half-kneeling Dead Stop Clean

B. Assisted Dead Stop Clean

C. Dead Stop Clean

D. Clean with Hike/Restart

E. Clean

The key to a smooth kettlebell clean is:

1) STRONG hip extension with no hip swivel: Contract the glutes, quads and midline simultaneously and forcefully- make it snappy. The hips do the work while the arms and back muscles guide the direction of the bell.

2) Upper Arm stitched to rib cage: Working elbow pulls just past your mid line as you tame the arc, keeping the bell close as soon as your hips extend.

3) Rotate the bell around your wrist, relax the arm.

4) Breathe: Your breathing pattern facilitates quality movement. As with any ballistic kettlebell exercise (please accept my apologies, as I don’t do a good job of demonstrating here while talking), remember to inhale through the nose as the bell swings inward (your relaxation phase), followed by a forceful exhale with your tongue pressed to the roof of your mouth upon hip extension (work phase).

And that about covers it. Give it a try, have fun, and let me know if you have any questions. Happy cleaning!

Holiday Happenings + The Turkish Get Up

aka

Kettlebell Exercises for Bullet Proof Shoulders: Part III

aka

Why the Turkish Get Up is Easier than a Single Bell Clean

Hello friends and internet randoms, Happy Holidays! I hope everyone enjoyed a very lovely Christmas/Hanukkah/Holiday of your Choosing, and that you all continue to remain excited for a brand new year. I, for one, am pretty stoked, having finally accomplished my most significant goal for 2019 - to become a certified strength and conditioning specialist (CSCS) with the National Strength and Conditioning Association (NSCA). Coincidentally, the NSCA just lost an ongoing lawsuit with CrossFit after publishing a biased study in their Journal of Strength and Conditioning Research which attributed incidences of overuse and injury to crossfit-style training, “despite deliberate periodization” and “supervision by certified fitness professionals”. Of course, CrossFit disputed this claim, and the study was the JSCR’s most viewed of all time - which I’m sure was not a coincidence. You can read more about the story here.

I maintain that both organizations contribute considerable value to the world of exercise, and indeed, they are now my most useful certifications when it comes to legitimizing myself as a trainer (as in, the hottest prerequisites for getting hired). Unfortunately, the NSCA and CrossFit are absolutely at war, and I get the feeling that many fitness professionals such as myself do their best to carefully toe the line of supporting both old and new school thinking. The NSCA represents the oldest-standing gold standard of collegiate level strength and conditioning, while CrossFit represents the newest approach, supported by the masses, infiltrating gyms and weight rooms everywhere. All this to say … Exactly one week ago, I sat in front of a computer at a testing center for a little over four hours and steadily lost my ability to see and think straight (that’s the real test though, isn’t it?). Thankfully, my brain somehow pulled through after months of studying, because I passed both sections with good marks - just in time to enjoy Christmas without my massive pile of flashcards! That said, I’m truly excited to pick right back up again with continuing ed in January, starting with finishing The Complete Shoulder and Hip Blueprint by Dean Somerset and Tony Gentilcore. (I wish I had realized earlier in life that when you actually enjoy what you’re learning about, learning is far from the most dreadful thing in the world.)

Abrupt Change Of Topic ( because this is my blog and I can do what I want :) )

I’m here today to write to you about kettlebell’s fanciest movement, the Turkish Get Up! Legend has it (aka, the story that the master instructor relayed at my RKC certification course) that this movement was the prerequisite for learning powerlifting and olympic lifting in eastern European countries - if you could not perform a TGU on both sides with a very heavy weight (I want to say it was one hundred pounds, but I may be wrong here), you could not begin with a barbell. It weeded out the weak, unfocused and uncoordinated, doubly serving as an automatic method of injury prevention.

While it has absolutely gained mainstream popularity with nearly direct proportionality to the rise of the kettlebell itself, performing a get up will draw stares from nearby gym goers nine times out of ten, should you choose to perform it outside of a kettlebell-centric environment. For starters, you begin the movement in the fetal position, which for all intents and purposes, appears to be the very opposite of exercise. (If you’ve ever taken CPR, you know that this is the ‘recovery position’.) Secondly, it’s long and technical - you can break the get up down into six or more parts just on the way up, which is exactly one half of a single rep (because what goes up must come down).

All of this said, I believe that the TGU is less complicated and arguably easier to perform than a cleanly-executed single bell clean. Wait, really? (this is your brain speaking, did I get it right?) What, why?

Here’s my line of thinking: While the TGU has several steps, it is designed to be done slowly and methodically. You have time to own each position, each of which is something you have done before - roll up, bridge, tripod, hinge, forward lunge, stand, backward lunge, tripod, hinge, roll down. The only difference is that you are actively stabilizing a heavy weight overhead (this is the hard part, of course). Once the initial work of memorizing each position is done (which follows a natural and rather intuitive flow, although I’d imagine some would argue with me on that), the bulk of the work remains in practicing fluidity and limb placement in transitions.

A clean, however, occurs in an instant- during which you must create ballistic force, react immediately with sufficient rigidity to resist transverse (rotational) force, and smoothly tame the arc of the bell, guiding it into the rack position without allowing the hips to swivel or weight to slam on the forearm. Just like a barbell clean, the inherent complexity of creating and controlling force in a matter of one or two seconds can and does take years to perfect. So, while I’m not saying that the TGU doesn’t take time to master, I am saying that it is a bit easier to gain technical proficiency of a slow, controlled movement than a ballistic, power-based one. Hopefully, if anything, this makes you more inclined to incorporate it as a regular warm up option for shoulder-intensive workouts, if you have avoided it in the past.

I will not go into a ton of detail about all the steps of the get up here, because goodness knows this has been done by people more knowledgeable by myself - and far be it from me to waste my time reinventing the wheel. Rather, I will quickly touch on a few points of greatest concern that are most often overlooked when I see the movement being taught or performed. If you are looking for a more in depth overview than my awkward (sorry, still learning how to talk to a camera) video below, here is an article from StrongFirst which provide’s a clinician’s perspective, and here is a step-by-step break down of the movement from Bar Bend.

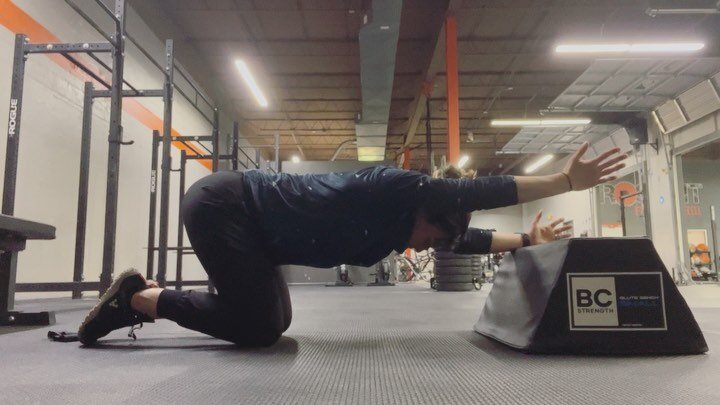
1) When you switch sides, stay in the fetal position and halo the bell over your head with both hands (trace a circle on the floor with the bell) while you transition to the fetal position on your opposite side, at which point you will be in the correct position to begin your next rep. This method of transition to switch sides prevents you from bringing the bell directly over and across your chest, which would be the slightly less heavy equivalent of performing a heavy set of bench press without a spotter or safety arms. The weight could end up resting right on your sternum, without a means to get it off. Sure, when you’re learning, the bell is nice and light, but it’s a good habit to get into for when you become more proficient and capable with heavier bells.

2) Hinge your hips back toward your heel and trace your unweighted hand down your leg during the downward part of the movement, as you transition from the lunge to the tripod. These steps do two things: a) allow you to simultaneously align the bell under your center of gravity (hips) and b) find your positioning on the floor without your eyes leaving the bell, which is always a priority.

3) It’s a Press Up and Across, not a Sit Up. As you press onto your forearm, you weight should shift up and across, from shoulder to shoulder, while maintaining a long spine. This diagonal transference of force allows you to lift far more weight than if you were to sit straight up. Just try it, you’ll see what I mean.

USAW Level I: Reflections and Lessons Learned

Hello friends and internet randoms, Happy Tuesday. I’m still riding a high following this past weekend, when I attended the USA Weightlifting Level 1 Sports Performance course (whew) in Washington, DC. As of about two minutes ago I am officially certified, having just passed the online test. Last Friday I also set a date to take the NSCA CSCS exam. After literally years of putting off studying and opting for less intimidating certifications (ones that don’t involve a thick textbook worth of preparatory material), this summer I finally buckled down and went for it. If all goes well, I’ll have met many of the goals nearest and dearest to my heart by the end of the year, which would be an awesome way to start 2020. Fingers crossed.

The whole crew!

The whole crew!

Anyway… back to weightlifting! An unfortunate consequence of two days packed with focus and intensive coaching is similar to that of cramming for a college final - it’s easy to forget everything you learned less than a week later. I didn’t get around to writing this post yesterday, and already I feel wisdom nuggets seeping from my brain. In an effort to combat this effect, I am taking two actions:

Action 1) Reflecting and documenting on my greatest takeaways from the course - mostly for myself, with the hope that anyone reading this is able to glean something useful from my experience. This includes learning at 7:10 am on a cold, windy morning that the metro does not run until 8:00 am on Sundays. (After momentary panic, I still made it on time.)

Action 2) Commit to observing coaching sessions at Rose Gold Athletics on a regular basis, about twice per month.

… which leads me to Take Away Number One:

Amanda keeping a close eye on pause drills.

Amanda keeping a close eye on pause drills.

1) No book, podcast, Instagram exercise demo, research summary, article, or any other hands-off experience replaces the value of being physically present to observe a highly experienced coach. While I found the lecture content of the course to be valuable and well formatted, the majority of it was not ground-breaking for a moderately experienced coach or trainer. Having attended various certifications throughout the years, it is not hard to notice that the same foundational exercise science material is always presented with relevant variations for the specialization at hand.

Stuff like (and I paraphrased my notes here):

Power comes from the center of the body and moves out, beginning at the largest joints before moving to the smallest joints.

When it comes to programming and loading, always use the minimum effective dose. Along the same lines, well-executed progressive overload involves minimally and gradually introducing increased weight.

Periodization! There is a rarely a good reason not to keep it simple.

You MUST prioritize recovery if you want to accomplish any sort of performance goal - starting with sleep, nutrition, and making adequate time to cool down. Because, as my old track coach used to say “If you don’t cool down, you might as well never have run.”

… and so forth.

Michael McKenna, head instructor and owner of McKenna’s Gym, and Amanda Rose, assistant instructor for the course and owner of Rose Gold Athletics, did such an incredible job of giving all twenty participants in-depth, one-on-one coaching. This is where the true value of the course became evident. For each drill and lift we performed, they were on us like butter on toast. Cuing was precise, straightforward, persistent and interactive, all the while providing enough psychological space for athletes to process and adjust as a necessary means of learning. A compliment was only to be received when it was well-earned (and let me tell you how freaking fantastic it felt to hear “beautiful!” “perfect!” or “8 out of 10” after using every last brain and muscle cell for the past twenty reps just trying to execute a half-decent clean pull).

Which leads us to Take Away Number Two:

2. Positive reinforcement, not negative reinforcement.

Pre- lift breathing and bracing exercises

Pre- lift breathing and bracing exercises

This might not mean what you think it means. It does not mean: be a cheerleader, act like the athlete is doing everything right even when they’re not, or batter the athlete over the head with encouraging but insincere statements that are offered in bad faith. People are intuitive and read right through that bullshit (provided they give a damn, and aren’t in the business of fooling themselves, too). I have to catch myself on this all the time, because I believe that my tendency as a coach is to be too encouraging. Not because I want to be a cheerleader (I don’t), but because I have a strong desire to acknowledge effort when I see it. I don’t want someone to become deterred when their seemingly fruitless persistence is not getting them where they want to be, because I know that their work will pay of eventually - even when they don’t see it in the moment. I know that sometimes it is helpful to have a trusted external source reinforce a patient, farsighted perspective in the midst of a frustrating training session. That said - there is a critical difference between acknowledging effort, and reinforcing a faulty movement pattern that may be slowly digging them into a hole. It may seem obvious not to conflate the two, but sometimes it’s easier said than done.

So, what do we mean by positive reinforcement? Simply put, telling someone to do something rather than not to do something. This is anchored in sports psychology, and is based on the way our brains are wired. People are far more receptive to being given a task than being told not to do something.

For example, if someone is struggling with bar path as soon as the bar leaves the ground, it is unhelpful to cue “don’t let the bar get away from you”. Even if the athlete recognizes their tendency to chase the bar, they probably don’t know how to solve it - plus, whatever cue they have been given before has yet to help (obviously). The athlete may become frustrated, and being told not to let the bar get away from them is likely met with the thinking “I know! But I don’t know how to fix it.”

So: Instead, maybe, pause the athlete in their set up, adjust positioning and lat engagement (or whatever), and then have them do lift offs with a focus of pushing the knees out and back, staying over the bar, or feeling the legs load with the bar locked in tight. (But not everything at once… pick one thing. Just one!)

Take Away Number Three:

3. Flair the lats.

Witnessing a beautiful snatch.

Witnessing a beautiful snatch.

This was huge for me, and it was explained using a partner drill. Get the bar in the power position, and depress - don’t retract - the shoulder blades. This should have the effect of locking the bar in toward your body by means of “flairing” the lats. Whether or not you have successfully accomplished this will be determined by your partner: Standing in front of you, they tug on the bar. If the bar flies away from your body by means of your shoulders moving into slight flexion, then your back muscles aren’t doing their job. Reset and try again, playing around until you’ve gotten tighter in the right places. If on your next attempt the bar does not fly away, and you move forward as one unit with the bar still locked in tight, then your lats are successfully flaired. Ta-da! Boom, back tension - a critical component to any lift.

Takeaway Number Four:

4. Fast is bad. Slow is smooth. Smooth is fast. Fast is good.

A teaching phrase stolen from the world of martial arts, this wise nugget serves to call out a most egregious error: using speed to mask weakness. Position is king, position is queen, position is everything - and it must always come first. Advanced lifters don’t miss lifts because they’re weak, they miss lifts due to technical errors. Beginners can get away with bad technique in the midst of neuromuscular pathway formation, their strength and technical capabilities disproportionately matched. Encouraging the introduction of speed prior to solid positioning is creating a band aid which will inevitably deteriorate and fall off. It’s just a matter of time, in the form of plateau or injury - whichever comes first.

Takeaway Number Five:

5. If your [body part] is your weakest link, your [body part] will always be your weakest link.

Hips, knees, back, whatever. This takeaway is not suggesting that working on your weaknesses is useless (obviously, it’s the best thing you can do). This is instead a reminder that strength is relative. Let’s say your back is weak, and evidently holding you back from hitting your next P.R. You then complete eight weeks of dead bugs, rows, resisted back extensions, weighted planks, etc. Your back gets strong AF, you get strong AF, you surpass your previous one rep. Awesome, mission accomplished. Except that training is a cycle. You may not be back at square one, but you are at square two. Square two enters into a training cycle with bigger percentages, and while your back was strong enough to handle the previous percentages, how will it handle the new ones? You’re stronger than you were before, and that got you where you are now. Time to level up and become even stronger, strong enough to handle the new loads that you are introducing. Everything is relative, including strength. Be prepared to come back and re-address weaknesses that rear their head - which you swore was dead - when you take the time to redirect and fix other weaknesses.

And there you have it… five takeaways from my weekend with USAW.

This

While I could write another essay diving into ten more takeaways, I also have to sleep at some point, and far be it from me not to practice what I preach (just kidding, I have a lifetime of work to do in the realm of training and recovery … and before someone calls me out on my cookie addiction, this is why I leave The Sassy Dietitian to preach nutrition. Also, for the record, I freaking love veggies.)

That said, I will leave you with one more point - not a takeaway per-se, but an opinion that I included on the certification feedback survey. I am including it here because it is a point that I feel strongly about; one that I feel even more strongly about on the occasion that I witness a trainer or coach standing around doing nothing while their client looks like an absolute baboon in the weight room*. Seriously, what is the poor client even paying for? I guarantee it wasn’t for obvious errors in form to go ignored. Anyway, here you have it, my unadulterated opinion in letter form:

“The one thing that I would change is not specific to this course, and applies to the vast majority of certification courses currently offered in fitness/ strength and conditioning - I don't think that a weightlifting coach should earn a certification after one weekend. I feel that this detracts from the significance of the title and lends itself to certifying coaches that should not necessarily be deemed qualified, and perhaps need more time and experience learning. (Honestly, I include myself among this group, and I am not brand new to weightlifting. It is for this reason that I am seeking out mentorship from an advanced weightlifting coach after the course so that I can continue to make a dent in the significant amount that I still don't know!) In other areas of education, a weekend is the same amount of time that corresponds with continuing education contributing to the greater goal, not the ultimate piece of paper that earns the student a respective title. 

I would like to see the certification process become more extensive and involve a certain number of hours of observation under a qualified coach, standardized testing of the coach's ability to perform the clean and jerk and snatch, demonstrated ability to work with individuals of all levels, and measured coaching competency. 

As an example - for the Russian Kettlebell and Strong First certifications, coaches must pass a standardized technique test for each fundamental movement (graded with a rubric), a conditioning test, and a coaching test. Becoming a Pilates instructor requires 450 hours of observation, practice and lecture, and the minimum number of hours to become a Yoga instructor is 200 hours. The failure rate of these courses is sometimes significant, which results in more reputable coaches and a higher bar - something that everyone could benefit from.

I recognize that every organization operates differently, but I would love for USAW to hold their coaches to a standard looked upon with a level of reverence and respect that makes people think twice before they decide to commit to the certification process. Not to deter potential coaches, but to encourage excellence.

So - all I would ask for is a little more time with all of the same amazing material, and tougher testing standards to raise the bar for becoming a USAW Level 1 Coach. That said, I look forward to learning more from the Level 2 course in the not-so-distant future. Thank you for an amazing course.”

*I am referring here to negligence, laziness, incompetence, or some combination of the three - NOT newer albeit caring coaches who do their best, but have yet to develop the requisite experience to know when to fix every possible mistake. Therein lies a critical difference. Every coach has their ‘off’ days, and I certainly wish mine were fewer and farther between. Indifference as a pattern of behavior uncoupled with any evident desire to change is when all days are off days, and thus become a problem.

Kettlebell Exercises for Bulletproof Shoulders: Part II

The Kettlebell Windmill

Hello! Happy Friday, friends. I’m here to talk to you about more kettlebell shoulder prep - this time, in the form of a windmill.

The windmill involves laterally hinging underneath the bell while maintaining a vertical arm, incorporating a side, hip and leg stretch while encouraging proper hip mechanics and dynamic stabilization of weight overhead.

Things to keep in mind when performing a windmill:

Similar to a Turkish Get Up or a mini band monster walk, a windmill should never be performed for time or as a core lift. If a military or bench press if your primary strength piece for the day, the windmill is the preparatory work you do before the movement, or the accessory work at the end of your training session.

Barbell Overhead Press = steak

Windmill = the glass of milk your mom makes you drink before you leave the table

Why not do this movement for time? There is no application for the windmill that makes it appropriate to perform in a manner that is not slow and controlled. If you try to AMRAP windmills, the mobility and scapular stability components will take second seat, and then you’ve lost the whole point.

Set up:

  1. Snatch or clean and press the bell overhead, depending on the weight.

  2. Position feet about shoulder-width apart - closer than you think they should be. Whenever I teach people the windmill, nine times out of ten they begin by bringing their feet out to a squat stance. This is too wide. (My stance in the video below should admittedly be smaller! )

  3. Pivot the feet 30-45 degrees away from the weighted arm. If you have progressed to the point where you are using two kettlebells, angle your toes away from the overhead arm.

  4. Shift your weight approximately 70% on your back leg, 30% on your front leg as you begin to push the hips out and back. The back leg should remain as straight as possible, with the front knee as soft/hinged as necessary (knee stacked on top of ankle) to maintain your neutral spine. Your shoulder moves down and to the side because your hips are moving back and away.

  5. DO NOT LATERALLY FLEX YOUR SPINE (don’t round your back) in an effort to get your shoulders lower and come into a deeper windmill, even if it means your bottom hand barely grazes below your knee. Depth will come with time and practice. Find mobility from your hips while maintaining a consistently neutral spine. If your spine starts to flex, then your hips are likely locked in place because you’re failing to find a proper hinge. I promise, your hips will move! Maybe not on the first try, and maybe not without some external or tactile cuing. It may take some time to build awareness if you are not used to the lateral hinge as a movement pattern.

  6. Once you’ve got the pattern down, 2-3 sets of 3-5 reps per side is great! No need to go for volume here - quality over quantity with a challenging but manageable weight will do the trick. Combine with Turkish Get Ups for a complete shoulder warm up.

  7. Have fun!

If you would like to read even more about the windmill, I suggest you check out this article by Brett Jones of StrongFirst!

Scapulohumeral Rhythm 101

Alternative Title: Why You Can’t Just Pin Your Shoulder Blades Down and Back for Ever and Always

Alternative-Alternative Title: Your Shoulders are Meant to Move, Dummy!

Performing a body weight or bent over row? Cue: “Shoulders down and back!”

Setting up a clean or deadlift?” Cue: “Shoulders down and back!”

Carrying groceries? Cue: “Shoulders down and back!”

Want to earn double your current salary while working from home (but also never working another day in your life)? You should probably sit leisurely while typing on your non-work computer with your shoulders down and back.

This cue is effectively the golden rule of exercise, aside from remembering to “lift with your legs, not your back” (I believe whoever popularized this doesn’t understand anatomy, but what do I know?).

While I theorize that the prevalence of this phrase comes from trainers and physiotherapists seeing a litany of clients exhibit excessive thoracic kyphosis (rounding of the upper back, or hunchback), scapular winging, egregious levels of upper trap and levator scapulae (aka neck muscles) engagement coupled with zero or minimal rhomboid function, and the like. For these dysfunctions of the upper back and shoulders, getting people out of a chest-closed, back-disengaged position is a clear priority.

But…

The shoulder blades, as part of a ball and socket joint, are meant to move! In so many ways:

1) Protraction vs. Retraction (abduction vs. adduction or towards and away from the spine)

2) Elevation vs. Depression (up and down)

3) Upward Rotation vs. Downward Rotation (imagine circular arrows going opposite directions)

4) Anterior vs. Posterior Tilt (think of a water bucket tipping forward vs. backward)

5) Internal vs. External Rotation (with elbow at 90 degrees by your side, forearm moves toward mid line, then away)

Often times these movements do not happen in isolation of each other outside of a clinical environment - especially in an athletic setting, the shoulder blades are moving in many ways at once. When hanging on a bar, for instance, the shoulder blades upwardly rotate, protract and elevate to bring the arms into position overhead. When contracting the lower traps, lats and rhomboids to begin a pull-up, the shoulder blades reverse that movement - depressing, abducting and rotating downward to initiate raising your torso towards the bar.

All of this to say: For us to focus on only two of ten possible independent movement patterns, even if well intentioned from the perspective of counteracting the most typical scapular dysfunction, creates an oversimplified, broad brush-stroke approach that results in an equal-and-opposite reaction landing us at the other end of the spectrum.

The key is to understand when it is important to keep the shoulder blades pinned down and back, versus the exercises for which allowing the shoulder blades to move about the rib is necessary to realize their full benefit: When deadlifting and squatting, keeping the shoulder blades in place is necessary because the hips are the primary movers in that exercise. While the hips and knees move from flexion into extension (or vis versa), the spine must stay rigid - and the shoulder blades locked into place as a secondary mechanism of reinforcing that rigidity. When performing upper body pulling and pushing movements aside from the bench press (pull ups, push ups, rows and overhead presses), to restrict the shoulder blades from moving away from the spine would be inhibiting the full range of motion of the movement and not allowing the proper muscle groups to effectively contract - a more visually obvious version of this would be to not extend the arms all the way when performing a pull up. You’ll probably notice if someone starts the next rep of their pull up set with the elbows still bent, but you might not notice if the shoulder blades elevate and move away from the spine. Bench press is the most notable exception to this - you definitely want to keep your shoulder blades depressed and retracted when benching, as this creates a necessary stable ‘shelf’ from which to initiate the movement and protect the shoulder capsule and rotator cuff under heavy weight.

I promise I’m going somewhere with this, because we’ve finally made it to… the star of the show, Glenohumeral Rhythm! (Don’t act like you’re not excited; after all, you’ve made it this far.)

scapular humeral rhythm.png

Glenohumeral rhythm is the coordinated coupled motion between the scapula and humerus, which is needed for efficient arm movement and allows for glenohumeral alignment in order to maximize joint stability. source 2:1 is the generally accepted ratio for the relationship between glenohumeral elevation and scapular upward rotation. That is to say: when the arm is rotated 180 degrees, 120 degrees occurs from the humerus at the shoulder joint, and 60 degrees from the scapula. Here’s the kicker: Scapular dyskinesis has been reported in 70-100% people with shoulder injuries including glenohumeral instability, rotator cuff abnormalities, and labral tears. source

Wait, what?

Basically, if you repeatedly pin your shoulder blades back while also moving the arm overhead, over time, you will teach your shoulder blades to remain fixed in one of their several natural positions - all of which exist for a functional reason. Especially when doing so under load, this will result in compensatory mechanisms over time (for example, over activation of rhomboids, which exist to retract your shoulder blades, or under utilization of the serratus anterior, which function to rotate the shoulder blades forward and up around the ribcage). While over activation of the scapular retractors may prevent you from resembling the hunchback of notre dame, your serratus anterior may become underutilized.

One of my favorite exercises to build awareness around controlled shoulder protraction is the TRX serratus slide, which I discovered thanks to Meghan Callaway, aka the fitness world’s unofficial Queen of Innovation and Creative Exercise Creation.

Here, she performs them with a single arm, because she is strong and badass with incomparable lumbo-pelvic stability. I suggest beginning with two arms to get the hang of it.

Another exercise to help facilitate serratus activation is the landmine press. I absolutely love using the landmine press for two and a half reasons:

1) As the closest alternative to barbell or dumbbell overhead pressing for angsty shoulders that feel crunchy and/or terrible pressing straight up.

2) As a fantastic way to coach the feeling of the scooping of the shoulder blades upward in a J-shaped pattern with a press, due to the diagonal angle provided by the landmine.

2.5) Because Eric Cressey said so (In case you hadn’t heard, Eric Cressey is always right. If there was a WWECD bracelet, I would wear it).

So, with a couple exercises and perhaps a hair too much anatomy over the desirable amount that should be present in any given blog post, I leave you here. Perhaps the next time you do a scap-push up, row, press or pull-up, your brain will draw some attention to the various positions that your shoulder blades move though. If you begin to notice that your scapulae stay tucked towards your back pockets as a hard and fast rule - no matter what exercise you are performing - I hope that now you have some guidance as to when and why it may be appropriate let them move and groove!

Kettlebell Exercises for Bulletproof Shoulders: Part I

The Kettlebell Arm Bar

The kettlebell arm bar is a highly demanding mobility and stability exercise for the shoulder. As the weight of the kettlebell helps pack the humerus into the glenoid cavity of the shoulder joint, the scapula retract while the smaller stabilizing muscles of the shoulder girdle fight to keep the bell secured in place overhead. This active stretch builds strength in a chest-open position, effectively compensating for a day's worth of seated posture. Try :30-:60 seconds for 2-3 rounds, starting with a light bell and working up to a challenging but controllable weight.

1) Basic 2) Side-lying Press 3) Bottoms Up 4) Internal/External Rotation

http://www.industryathletics.com/kettle-bell-arm-bar/